Connecting to Live Sources
All visualizations in AdvantageScope are designed to receive live data from a robot or simulator in addition to log files. This section describes how to connect to real time data sources.
Configuration
Open the preferences window by pressing cmd/ctrl + comma or clicking "Help" > "Show Preferences..." (Windows/Linux) or "AdvantageScope" > "Settings..." (macOS).
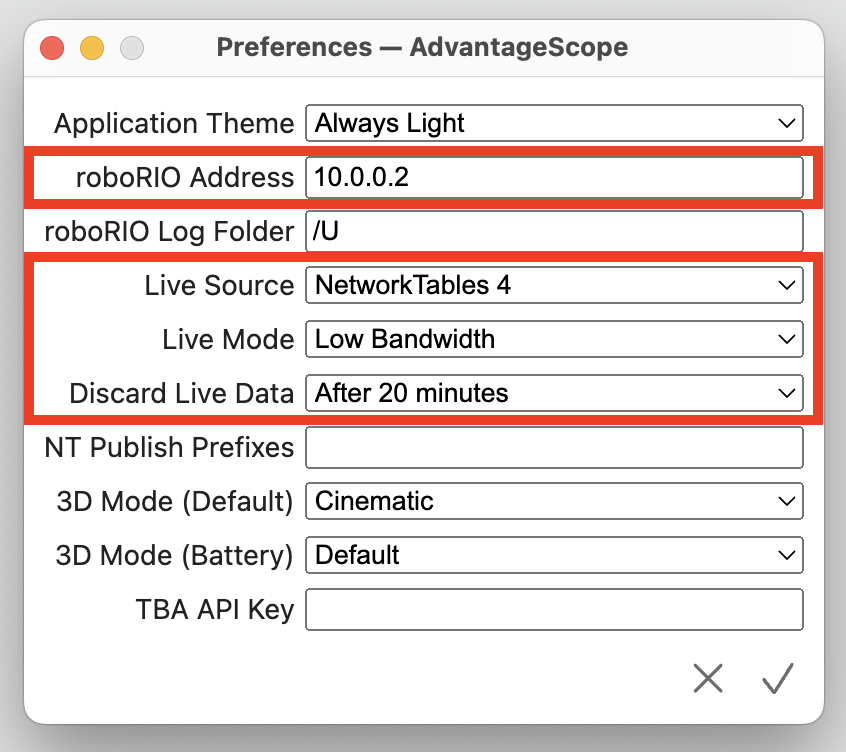
roboRIO Address
Enter the roboRIO address using a 10.TE.AM.2 IP address as described in the WPILib docs. Click "File" > "Use USB roboRIO Address" to temporarily use the IP address "172.22.11.2" for all connections.
Live Source
The following sources of live data are supported by AdvantageScope:
- NetworkTables 4: This is the default networking protocol starting in WPILib 2023, and is commonly used by dashboards, coprocessors, etc. See the WPILib documentation for more details. Note that NetworkTables 3 (used by WPILib 2022 and older) is not supported by AdvantageScope.
- NetworkTables 4 (AdvantageKit): This mode is designed for use with robot code running AdvantageKit, which publishes to the "/AdvantageKit" table in NetworkTables. The only difference from the NetworkTables 4 mode is that the "/AdvantageKit" table is used as the root, which allows for easier switching between an NT4 connection and an AdvantageKit log file.
- Phoenix Diagnostics: This mode uses HTTP to connect to a Phoenix diagnostic server, which allows for data streaming from CTRE CAN devices with Phoenix 6. This is similar to the plotting feature in Phoenix Tuner, but includes support for previewing values in the sidebar and storing the full history of signals (like any other AdvantageScope live source). Note that the diagnostic server only supports plotting signals from one device at a time. AdvantageScope will switch between devices automatically based on the signals being viewed.
- PathPlanner 2023: This mode connects using the
PathPlannerServerprotocol used for telemetry by PathPlanner 2023. The connection is always initiated on port 5811. Note that PathPlanner 2024 and later publish telemetry data using NetworkTables, so the NetworkTables 4 mode should be used. - RLOG Server: This protocol is supported by AdvantageKit as an alternative to NetworkTables. The connection is initiated on port 5800 by default.
Note: The Phoenix Diagnostics live mode uses an undocumented protocol that may be changed in future Phoenix updates. If this mode does not function properly, please update to the latest version of AdvantageScope. If the issue persists, please open an issue to let us know.
Live Mode
When NetworkTables is used as the live source, the following live modes can be selected:
- Low Bandwidth (Default): AdvantageScope only requests data from the server for fields that are actively being used. Data published before a field was selected will not be available. This mode is highly recommended when running in an environment with limited network bandwidth, such as on the field.
- Logging: AdvantageScope requests data for all fields regardless of whether they are actively being used. This means that fields can be viewed retroactively by pausing the stream of live data (see below). This mode is often useful during development but should NOT be used on the field.
Discard Live Data
During a live connection, data is stored locally to allow for replay of past data (see "Viewing Live Data" below). To avoid very high memory usage, data is discarded after 20 minutes by default. A shorter period can be selected to reduce memory usage, or "Never" can be selected to store live data indefinitely.
Starting the Connection
To start the connection to a robot (using the configured "roboRIO Address") or a simulator (using "127.0.0.1"), follow these steps:
- Robot: Click "File" > "Connect to Robot" or press cmd/ctrl + K
- Simulator: Click "File" > "Connect to Simulator" or press shift + cmd/ctrl + K
The window title displays the IP address and the text "Searching" until the robot/sim is connected. It attempts to reconnect automatically using the same settings after a disconnect.
Viewing Live Data
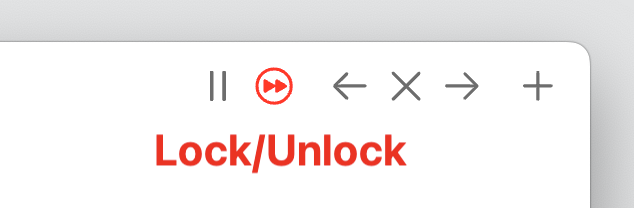
When connected to a live source, AdvantageScope locks all tabs to the current time by default. Views like the 📉 Line Graph and 🔢 Table autoscroll, and views like odometry and joysticks display the current values of each field. Clicking the red arrow button in the navigation bar toggles this lock, enabling viewing and replay of past data.
Note: Scrolling to the left in the line graph also unlocks from the current time, and scrolling all the way to the right locks to the current time again.
Tuning Mode
Some live sources support live tuning of numeric and boolean values. For example, this feature can be used to tune controller gains when connected to a NetworkTables source. Note that the robot code must support receiving gains via NetworkTables.
By default, all values in AdvantageScope are read-only. To toggle tuning mode, click the slider icon to the right of the search bar when connected to a supported live source. When the icon is purple, tuning mode is active and field editing is enabled.
- To edit a numeric field, enter a new value using the text box to the right of the field in the sidebar. The value is published after the input is deselected or the "Enter" key is pressed. Leave the text box blank to use the robot-published value.
- To toggle a boolean field, click the red or green circle to the right of the field in the sidebar.
Note: This feature is not intended for controlling the robot on the field. Support for dashboard-style inputs like choosers, trigger buttons, etc. will not be added.